Create SEO Optimized Food Recipe Layout With Divi Theme
The more popular a food blog is, the greater are the opportunities to monetize it. Divi Theme is a good choice to make such a blog.
To make a popular food blog, you’ll need to
- Provide recipes information to the minutest details. Details like
- Recipe title that conveys the precise information
- Recipe brief description
- Good quality recipe image & video
- Detailed list of ingredients & equipments. Create monetization opportunity by adding affiliate links.
- Add author details to make it more personal.
- Add nutrition information so that visitors can make an informed decision
- Integrate user ratings in the form of
- A rating form that a user can submit
- List of the user rating comments
- Rating summary
- Provide helpful information like
- Preparation time
- Cooking time
- Total time
- Cuisine type
- Course type
- etc
- Notes for the recipe
- Recipe Schema data aimed at helping search engines (SERP). Increase visitors on your website.
Pre-requisites
- A WordPress website
- Divi Theme by Elegant Themes
- Food Recipe Plugin plugin
- Site Reviews Plugin
- Divi Recipe Layout - Download
Tools
- Computer
- Text Editor
Estimated Cost : 50 USD+
Total Duration : 60 minutes
Start your FREE trial. No credit cards required.
Plugins & Theme Installs
-
Make sure you have the following installed on your WordPress website.
- Divi Theme by Elegant Themes
- Food Recipe Plugin plugin
- Site Reviews Plugin. This plugin powers the rating/review user form, summary and user comments for the recipe.
Start your FREE trial. No credit cards required.
Enable Divi Builder For "Food Recipes" Post Type
-
We have a Food Recipes post type. Enable divi builder for it by
- Going to WordPress Admin > Divi > Theme Options
- Click on the Builder tab
- Click on the Advanced tab
- Toggle the Food Recipe from disabled to enabled
- Click on Save Changes
Start your FREE trial. No credit cards required.
Create Recipe Template In Divi Theme Builder
-
Divi provides Divi Theme Builder to create templates and assign it to pages/posts.
-
To create a recipe template
- Goto WordPress Admin > Divi > Theme Builder
- Click on the Add New Template icon button
- In the Template Settings modal pop-up, tick the All Food Recipes check box.
- Note: You can select specific food recipe posts too.
- You can now add a Custom Header, Custom Body and Custom Footer to this template.
- We will add a Custom Body and use the divi modules from the food recipes plugin.
- Click on Custom Body
- In the next window, click on Start Building from the Build from scratch info box.
- You can now ready to create your recipe template.
- From here onwards, we'll refer to it as Recipe Template
Start your FREE trial. No credit cards required.
Recipe Image Divi Module & Post Meta Data
-
This represents the image of the completed dish.
-
For best results, provide multiple high-resolution image with aspect ratios: 16x9, 4x3, and 1x1.
-
To add a recipe image
- Goto WordPress Admin > Food Recipes
- Edit the recipe post in non-divi mode
- Goto the Recipe Information meta box
- Upload or select image for the Image post meta
-
To add recipe image to recipe template
- Open the recipe template in divi theme builder
- Insert the Recipe Image divi module on the page.
- In the Recipe Image Module Settings
- Use the default --Use Current Recipe Post-- for Select Recipe Post Item. It ensures we use the current recipe post when creating the recipe page.
- You can setup the following design settings for the image
- Alignment
- Sizing
- Spacing - Margin & Padding
- Border
- Box Shadow
- etc
- We also provide ability to add custom css in the Advanced tab
Start your FREE trial. No credit cards required.
Recipe Title Divi Module & Post Data
-
Title represents the name of the dish.
-
To add/update a recipe image
- Goto WordPress Admin > Food Recipes
- Either create a new Food Recipe post or update one.
- The title of this post represents the recipe title
-
To add recipe image to recipe template
- Open the recipe template in divi theme builder
- Insert the Recipe Title divi module on the page.
- In the Recipe Title Module Settings
- Use the default --Use Current Recipe Post-- for Select Recipe Post Item. It ensures we use the current recipe post when creating the recipe page.
- You can setup the following design settings for the title
- Recipe Title font settings
- Spacing - Margin & Padding
- Border
- Box Shadow
- etc
- We also provide ability to add custom css in the Advanced tab
Start your FREE trial. No credit cards required.
Recipe Description Divi Module & Post Meta Data
-
Recipe description is a short summary describing the dish. It also shows up on search engine results.
-
A well thought out description can increase traffic in form of users clicks from SERP
-
To add a recipe description
- Goto WordPress Admin > Food Recipes
- Edit the recipe post in non-divi mode
- Goto the Recipe Information meta box
- Add your description in the Description post meta
-
To add recipe description to recipe template
- Open the recipe template in divi theme builder
- Insert the Recipe Title divi module on the page.
- In the Recipe Title Module Settings
- Use the default --Use Current Recipe Post-- for Select Recipe Post Item. It ensures we use the current recipe post when creating the recipe page.
- You can setup the following design settings for the description
- Recipe description font settings
- Spacing - Margin & Padding
- Border
- Box Shadow
- etc
- We also provide ability to add custom css in the Advanced tab
Start your FREE trial. No credit cards required.
Recipe Author Divi Module & Post Meta Data
-
It represents the name, image and URL of the author that wrote the recipe.
-
To add/update a recipe author information
- Goto WordPress Admin > Food Recipes
- Edit the recipe post in non-divi mode
- Goto the Recipe Information meta box & scroll to the Author dropdown field
- You can select of the three options.
- None : Don't associate author details with this recipe
- Post Author : Use the name, image (gravatar) and URL of WordPress user that published this recipe.
- Custom : Manually enter the name, image and URL of the author
-
To add recipe author to recipe template
- Open the recipe template in divi theme builder
- Insert the Recipe Author divi module on the page.
- In the Recipe Author Module Settings
- Use the default --Use Current Recipe Post-- for Select Recipe Post Item. It ensures we use the current recipe post when creating the recipe page.
- You can setup the following design settings for the description
- Author Name - Font Settings
- Author Name Link - Font Settings
- Prefix Text - Font Settings. Its the text before the author name
- Author Image
- Show Image - Toggle on to show, off to hide
- Image Size - Control the width of the image
- Right Spacing - The spacing to the right of the image
- Border & Border Radius Settings
- Spacing - Margin & Padding
- Border
- Box Shadow
- etc
- We also provide ability to add custom css in the Advanced tab
Start your FREE trial. No credit cards required.
Recipe Cuisine Divi Module & Post Meta Data
-
It's the region associated with your recipe. For example, "French", Mediterranean", or "American".
-
To add/update a recipe cuisine information
- Goto WordPress Admin > Food Recipes
- Edit the recipe post in non-divi mode
- Goto the Recipe Information meta box & scroll to the Cuisine multi select check boxes.
- You can select from the pre-defined cuisine names and/or add comma-separate cuisine names in the text box below the check boxes.
-
To add recipe cuisine to recipe template
- Open the recipe template in divi theme builder
- Insert the Recipe Cuisine divi module on the page.
- In the Recipe Cuisine Module Settings
- Use the default --Use Current Recipe Post-- for Select Recipe Post Item. It ensures we use the current recipe post when creating the recipe page.
- Show Title : A toggle field. Set to 'YES' to show the cuisine title. Default is "Cuisine".
- Title Text : Name of the title. Default is "Cuisine"
- You can setup the following design settings for the cuisine
- Layout : A drop down field with the following options
- Single Line - Shows the title and the cuisine name(s) in a single line
- Multi Line - Shows the title and the cuisine names(s) on separate lines
- You can setup the following design settings for
- Title : font settings for the title
- Cuisine : font settings for the cuisine name
- Spacing - Margin & Padding
- Border
- Box Shadow
- etc
- We also provide ability to add custom css in the Advanced tab
Start your FREE trial. No credit cards required.
Recipe Course Divi Module & Post Meta Data
-
It's the meal type or course your recipe is about. For example: "dinner", "main course", or "dessert, snack".
-
- Goto WordPress Admin > Food Recipes
- Edit the recipe post in non-divi mode
- Goto the Recipe Information meta box & scroll to the Categories multi select check boxes.
- You can select from the pre-defined cuisine names and/or add comma-separate course names in the text box below the check boxes.
-
To add recipe course to recipe template
- Open the recipe template in divi theme builder
- Insert the Recipe Course divi module on the page.
- In the Recipe Course Module Settings
- Use the default --Use Current Recipe Post-- for Select Recipe Post Item. It ensures we use the current recipe post when creating the recipe page.
- Show Title : A toggle field. Set to 'YES' to show the course title. Default is "Course".
- Title Text : Name of the title. Default is "Course"
- You can setup the following design settings for the course
- Layout : A drop down field with the following options
- Single Line - Shows the title and the course name(s) in a single line
- Multi Line - Shows the title and the course name(s) on separate lines
- You can setup the following design settings for
- Title : font settings for the title
- Course : font settings for the course name
- Spacing - Margin & Padding
- Border
- Box Shadow
- etc
- We also provide ability to add custom css in the Advanced tab
Start your FREE trial. No credit cards required.
Recipe Prep Time Divi Module & Post Meta Data
-
It represents the length of time it takes to prepare the dish.
-
To add/update a recipe preparation time information
- Goto WordPress Admin > Food Recipes
- Edit the recipe post in non-divi mode
- Goto the Recipe Information meta box & scroll to the Prep Time
- Set the appropriate preparation time
-
To add recipe preparation time to recipe template
- Open the recipe template in divi theme builder
- Insert the Recipe Prep Time divi module on the page.
- In the Recipe Prep Time Module Settings
- Use the default --Use Current Recipe Post-- for Select Recipe Post Item. It ensures we use the current recipe post when creating the recipe page.
- Show Title : A toggle field. Set to 'YES' to show the preparation time title. Default is "Prep Time".
- Title Text : Name of the title. Default is "Prep Time"
- You can setup the following design settings for the preparation time
- Layout : A drop down field with the following options
- Single Line - Shows the title and the preparation time in a single line
- Multi Line - Shows the title and the preparation time on separate lines
- You can setup the following design settings for
- Title : font settings for the title
- Time : font settings for the preparation time
- Spacing - Margin & Padding
- Border
- Box Shadow
- etc
- We also provide ability to add custom css in the Advanced tab
Start your FREE trial. No credit cards required.
Recipe Cook Time Divi Module & Post Meta Data
-
It represents the time it takes to cook the dish
-
To add/update a recipe cook time information
- Goto WordPress Admin > Food Recipes
- Edit the recipe post in non-divi mode
- Goto the Recipe Information meta box & scroll to the Cook Time
- Set the appropriate cook time
-
To add recipe cook time to recipe template
- Open the recipe template in divi theme builder
- Insert the Recipe Cook Time divi module on the page.
- In the Recipe Cook Time Module Settings
- Use the default --Use Current Recipe Post-- for Select Recipe Post Item. It ensures we use the current recipe post when creating the recipe page.
- Show Title : A toggle field. Set to 'YES' to show the cook time title. Default is "Cook Time".
- Title Text : Name of the title. Default is "Cook Time"
- You can setup the following design settings for the cook time
- Layout : A drop down field with the following options
- Single Line - Shows the title and the cook time in a single line
- Multi Line - Shows the title and the cook time on separate lines
- You can setup the following design settings for
- Title : font settings for the title
- Time : font settings for the cook time
- Spacing - Margin & Padding
- Border
- Box Shadow
- etc
- We also provide ability to add custom css in the Advanced tab
Start your FREE trial. No credit cards required.
Recipe Total Time Divi Module
-
It represents total time it takes to prepare and cook the dish
-
To add recipe total time to recipe template
- Open the recipe template in divi theme builder
- Insert the Recipe Total Time divi module on the page.
- In the Recipe Total Time Module Settings
- Use the default --Use Current Recipe Post-- for Select Recipe Post Item. It ensures we use the current recipe post when creating the recipe page.
- Show Title : A toggle field. Set to 'YES' to show the total time title. Default is "Total Time".
- Title Text : Name of the title. Default is "Total Time"
- You can setup the following design settings for the total time
- Layout : A drop down field with the following options
- Single Line - Shows the title and the total time in a single line
- Multi Line - Shows the title and the total time on separate lines
- You can setup the following design settings for
- Title : font settings for the title
- Time : font settings for the total time
- Spacing - Margin & Padding
- Border
- Box Shadow
- etc
- We also provide ability to add custom css in the Advanced tab
Start your FREE trial. No credit cards required.
Recipe Nutrition Divi Module & Post Meta Data
-
It represents the nutrition information about the recipe.
-
To add/update a recipe nutrition information
- Goto WordPress Admin > Food Recipes
- Edit the recipe post in non-divi mode
- Goto the Recipe Information meta box & scroll to the Nutrition Section
- We have set of pre-defined nutrition types that we used in SEO schema. They are
- Calories : The number of kilo calories.
- Carbohydrate : The number of grams of carbohydrates.
- Cholesterol : The number of milligrams of cholesterol.
- Fat : The number of grams of fat.
- Fiber : The number of grams of fiber.
- Protein : The number of grams of protein.
- Saturated Fat : The number of grams of saturated fat.
- Sodium : The number of milligrams of sodium.
- Sugar : The number of grams of sugar.
- Trans Fat : The number of grams of trans fat.
- Unsaturated Fat : The number of grams of unsaturated fat.
- To add custom nutrition information
- Click on Add Nutrition Attribute Button.
- An empty row will appear. Fill the appropriate Nutrition Label, Quantity and Quantity Unit
-
To add recipe nutrition information to recipe template
- Open the recipe template in divi theme builder
- Insert the Recipe Nutrition divi module on the page.
- In the Recipe Nutrition Module Settings
- Use the default --Use Current Recipe Post-- for Select Recipe Post Item. It ensures we use the current recipe post when creating the recipe page.
- Columns - Desktop : Set the number of columns for the data grid in desktop view.
- Columns - Tablet : Set the number of columns for the data grid in tablet view.
- Columns - Mobile : Set the number of columns for the data grid in mobile view.
- You can setup the following design settings for
- Title : font settings for the title
- Nutrition Value : font settings for nutrition value and units
- Nutrition Item Container : Main wrapper for a nutrition item. A nutrition item holds the title and nutrition value.
- Margin & Padding
- Spacing - Margin & Padding
- Border
- Box Shadow
- etc
- We also provide ability to add custom css in the Advanced tab
Start your FREE trial. No credit cards required.
Recipe Video Divi Module & Post Meta Data
-
It represents a video depicting the steps to make the dish.
-
To add/update a recipe video
- Goto WordPress Admin > Food Recipes
- Edit the recipe post in non-divi mode
- Goto the Recipe Information meta box & scroll to Video
- Click on Add Video and
- Select Type of the video. It could be
- HTML5 Video : Indicates that the video is a HTML5 video.
- MP4 Link : Link to the mp4 video
- Webm Link : Link to the webm video
- YouTube: Indicates the video is a YouTube video
- YouTube Video ID : ID of the YouTube video. If https://www.youtube.com/watch?v=l0CIdu7sXAQ is the url then l0CIdu7sXAQ is the video ID
- Vimeo : Indicates that the video is from vimeo.
- Vimeo Video ID : ID of the vimeo video. If https://vimeo.com/382219966 is the url, then 382219966 is the video ID.
- FaceBook Video : Indicates that the video is from FaceBook.
- Facebook Video Href: Provide the url of the facebook video. For example, https://www.facebook.com/watch/?v=2561911507236044
- HTML5 Video : Indicates that the video is a HTML5 video.
- Image: Set the poster image for the video.
- Upload Date: The date the video was uploaded/published.
- Select Type of the video. It could be
-
To add recipe video to recipe template
- Open the recipe template in divi theme builder
- Insert the Recipe Video divi module on the page.
- In the Recipe Video Module Settings
- Use the default --Use Current Recipe Post-- for Select Recipe Post Item. It ensures we use the current recipe post when creating the recipe page.
- You can setup the following design settings for
- Spacing - Margin & Padding
- Border
- Box Shadow
- etc
- We also provide ability to add custom css in the Advanced tab
Start your FREE trial. No credit cards required.
Recipe Instructions Divi Module & Post Meta Data
-
It represents the steps to make the dish.
-
To add/update recipe instructions
- Goto WordPress Admin > Food Recipes
- Edit the recipe post in non-divi mode
- Goto the Recipe Information meta box & scroll to the Instructions Section
- Select the Instruction Type that indicates the type of the instructions
- Simple List (Recommended) : If you want a simple list of instructions, choose this option
- After selecting Simple List, click on Add Step button
- Add the Name (optional), Instructions Text & Media Type (None for no media, image or video)
- Keep on repeating the steps until done.
- Grouped List : If you want to have a list of instruction in different groups, choose this option.
- After selecting Grouped List, click on Add Instruction Group button.
- Enter the Group Name
- Click on Add Step just like Simple List and add steps until done.
- Simple List (Recommended) : If you want a simple list of instructions, choose this option
- Select the Instruction Type that indicates the type of the instructions
-
To add recipe instructions to recipe template
- Open the recipe template in divi theme builder
- Insert the Recipe Instructions divi module on the page.
- In the Recipe Instructions Module Settings
- Use the default --Use Current Recipe Post-- for Select Recipe Post Item. It ensures we use the current recipe post when creating the recipe page.
- Create Recipe Schema Data - A toggle switch. Select 'ON' to output LD+JSON recipe schema, else select 'OFF'.
- You can setup the following design settings for
- Instruction List Container : It's the wrapper that holds the instruction steps.
- Set Margin & Spacing
- Instruction Group Name: Style the group name font and select heading level.
- Instruction Container: Wrapper that holds a single instruction step.
- Set Margin & Spacing
- Set Border & Border Radius
- Instruction Step Count : The counter text for the instruction step.
- Style font
- Instruction Text Container: A wrapper that holds the instruction title and instruction details text
- Width: Control the width of the container
- Margin & Padding
- Instruction Title : Title of the instruction step.
- Style font
- Instruction Text: Description of the instruction step
- Style font
- Instruction Media: Wrapper that holds the instruction media (image / video)
- Set the width for the wrapper
- Instruction Image: Image representing the instruction step
- Show In Lightbox: Toggle
ONto make the image open in a lightbox on click - Image Overlay: Toggle
ONto show on overlay over the image on hover.- Icon Color: Color of the icon in the overlay
- Overlay Color: Background color of the overlay
- Icon: Select the icon for the overlay
- Show In Lightbox: Toggle
- Spacing - Margin & Padding
- Border
- Box Shadow
- etc
- Instruction List Container : It's the wrapper that holds the instruction steps.
- We also provide ability to add custom css in the Advanced tab
Start your FREE trial. No credit cards required.
Recipe Equipments Divi Module & Post Meta Data
-
Represents the objects used in preparing the dish.
-
Creating a list of equipments.
- Custom Type Equipments holds a list of the equipments
- To create an equipment entry
- Goto WordPress Admin > Food Recipes > Equipments
- Click on Add Equipment button at the top
- The
post titlerepresents the name of the equipment - One can add a
featured imageof the equipment - In the Affiliate Information meta box, one can add the Affiliate Link. Helps in monetization. For example affiliate link to amazon.
-
Adding equipments to a recipe.
- Goto WordPress Admin > Food Recipes
- Edit the recipe post in non-divi mode
- Goto the Recipe Information meta box & scroll to the Equipments Section
- Select one or more equipments from the Equipment Name multi-select list.
- One can search for an equipment
- One can set ordering of the equipment by drag and drop.
-
To add recipe equipments to recipe template
- Open the recipe template in divi theme builder
- Insert the Recipe Equipments divi module on the page.
- In the Recipe Equipments Module Settings
- Use the default --Use Current Recipe Post-- for Select Recipe Post Item. It ensures we use the current recipe post when creating the recipe page.
- Show Image : Toggle
ONto show image associated with equipment - Columns - Desktop : Set the number of columns for the equipment list grid in desktop view.
- Columns - Tablet : Set the number of columns for the equipment list grid in tablet view.
- Columns - Mobile : Set the number of columns for the equipment list grid in mobile view.
- You can setup the following design settings for
- Equipment Image : Represents the image of the equipment.
- Set border and border radius
- Equipment Name : Represents of the name of the equipment.
- Add font styles
- Equipment Item Container: Its the wrapper that holds a single equipment
- Set border & border radius
- Icon : Represents the icon associated with each equipment item
- Show Icon: Toggle
ONto show the icon- Icon: Select icon from the list
- Icon Margin Right: Set the right margin for the icon
- Color: Select the color of the icon
- Show Icon: Toggle
- Spacing
- etc
- Equipment Image : Represents the image of the equipment.
- We also provide ability to add custom css in the Advanced tab
Start your FREE trial. No credit cards required.
Recipe Ingredients Divi Module & Post Meta Data
-
Represents the ingredients used in the recipe.
-
Creating a list of ingredients.
- Custom Type Ingredients holds a list of the ingredients
- To create an ingredient entry
- Goto WordPress Admin > Food Recipes > Ingredients
- Click on Add Ingredient button at the top
- The
post titlerepresents the name of the ingredient - In the Affiliate Information meta box, one can add the Affiliate Link. Helps in monetization. For example affiliate link to amazon.
-
Adding ingredients to a recipe.
- Goto WordPress Admin > Food Recipes
- Edit the recipe post in non-divi mode
- Goto the Recipe Information meta box & scroll to the Ingredients/Materials Section
- Click on Add Ingredient Group. This way you can group you ingredients. For example ingredients for pizza dough, red sauce, pizza toppings.
- Add the Group Name
- To add an ingredient, click on Add Ingredient
- Add Quantity of the ingredient
- Select the ingredient from the Name ingredient list.
- Add Quality unit for the quantity. For example cup, tbsp etc
- Add notes, if any.
-
To add recipe ingredients to recipe template
- Open the recipe template in divi theme builder
- Insert the Recipe Ingredients divi module on the page.
- In the Recipe Ingredients Module Settings
- Use the default --Use Current Recipe Post-- for Select Recipe Post Item. It ensures we use the current recipe post when creating the recipe page.
- Columns - Desktop : Set the number of columns for the equipment list grid in desktop view.
- Columns - Tablet : Set the number of columns for the equipment list grid in tablet view.
- Columns - Mobile : Set the number of columns for the equipment list grid in mobile view.
- Item gap: Set the gap between the row and columns of the grid
- You can setup the following design settings for
- Ingredient Category : Set the font style and heading for the ingredient group name
- Ingredient List : Wrapper containing an ingredients list
- Set margin and padding
- Border and border radius
- Ingredient Item : Represents a single ingredient
- Show Icon: Toggle
ONto show an icon next to the ingredient- Icon: Select the icon
- Icon Margin Right: Set the margin right spacing for the icon
- Color: Color of the icon
- Margin and padding
- Font styles
- Border and border radius
- Show Icon: Toggle
- Ingredient Item Link: Represents the link (affiliate) associated with the ingredient.
- Set font style
- Border & border radius
- Spacing
- Border
- Box Shadow
- etc
- We also provide ability to add custom css in the Advanced tab
Start your FREE trial. No credit cards required.
Recipe Ratings Form Divi Module & Post Meta Data
-
Consumer-generated ratings and reviews is important. It's a social proof for your recipes!
-
In our case, its an important signal that impacts whether website visitors use your recipe.
-
For collecting ratings and reviews, we need a form. We provide a divi module to embed and style such form.
-
It uses the Site Reviews Plugin. Please ensure you have it installed and activated.
-
To add recipe rating form to recipe template
- Open the recipe template in divi theme builder
- Insert the Recipe Ratings Form divi module on the page.
- In the Recipe Ratings Form Module Settings
- Use the default --Use Current Recipe Post-- for Select Recipe Post Item. It ensures we use the current recipe post when creating the recipe page.
- Show Ratings Stars : Toggle
ONto show the rating stars on the form. One can then select the rating they want. - Show Title : Toggle
ONto show the title input field. - Show Review Content : Toggle
ONto show review input field. - Show Name: Toggle
ONto show the name input field. - Show Email: Toggle
ONto show the email input field. - Show Consent/Terms Fields: Toggle
ONto show the consent toggle. - You can setup the following design settings for
- Input Label : Represents the input field labels of the form
- Style fonts
- Consent Description Text : Represents the text description of the consent field.
- Style fonts
- Set margin and padding
- Set border and border radius
- Input Text : Represents the input text field of the form
- Style font
- Button : Represents the submit button of the form
- Custom style the buttons
- Font
- Background Color
- Border and border radius
- Icon
- Button alignment
- Margin and padding
- Custom style the buttons
- Invalidated Input Field : Represents an invalidated input field
- Set border and border radius
- Input Error Message : Represents the error message per input field
- Style font
- Form Error Message : Represents the error message for the form.
- Style font
- Success Message: Represents the success message on form submission
- Style font
- Stars : Represents the click-able star elements.
- Set star color
- Spacing
- Border
- Box Shadow
- etc
- Input Label : Represents the input field labels of the form
- We also provide ability to add custom css in the Advanced tab
Start your FREE trial. No credit cards required.
Recipe Ratings List Divi Module & Post Meta Data
-
Show a list of the customer-generated reviews. Optionally include pagination.
-
To add recipe rating form to recipe template
- Open the recipe template in divi theme builder
- Insert the Recipe Ratings Form divi module on the page.
- In the Recipe Ratings Form Module Settings
- Use the default --Use Current Recipe Post-- for Select Recipe Post Item. It ensures we use the current recipe post when creating the recipe page.
- Pagination: Drop-down field on whether to paginate the recipe list. Options are
- Disable : Disables pagination. Shows all reviews and ratings.
- Enable : Enables paginated results. On clicking pagination links, entire page is reloaded.
- Enabled With Ajax : Enables paginated results. On clicking pagination links, pagination list is loaded via ajax.
- Review Display Count: Select the number of reviews to show on the page. Shows when
Paginationfield is eitherEnableorEnable With Ajax. - Minimum Star Rating : The minimum start rating to fetch.
- No Reviews Fallback Text: The text thats shown when the recipe has no reviews.
- Show Assigned Links : Shows the link to the post/page to which the review is assigned to, when toggle is set to
ON - Show Author: Shows details of the user that submitted the review, when toggle is set to
ON - Show Avatar: Shows the avatar of the user that submitted the review, when toggle is set to
ON - Show Content: Show the review content, when toggle is set to
ON - Show Date: Show the date of the review, when toggle is set to
ON - Show Rating: Show the rating stars, when toggle is set to
ON - Show Response: Show the response to the review, when toggle is set to
ON - You can setup the following design settings for
- Review Item : Container that wraps the review list item
- Set margin and padding
- Set border and border radius
- Review Title : Text representing the title of the review.
- Set margin and padding
- Set font styles
- Review Assigned Link Text : The plain-text part of the
Review Assigned Linksection.- Set font styles
- Review Assigned Link : The link part of the
Review Assigned Link- Set font styles
- Review Date: The date text of the review
- Set font style
- Review Author: The text representing the review author
- Set font style.
- Active Page Number: The text representing the active page number in the pagination.
- Style font style
- Page Numbers: The links in the pagination section
- Set font style
- Pagination Next Link : The
nextpage link of the pagination section- Set font style.
- Pagination Previous Link : The
previouspage link of the pagination section.- Set font style.
- Star: The star representing the review
- Set color of the star
- Set size of the star
- Spacing
- Border
- Box Shadow
- etc
- Review Item : Container that wraps the review list item
- We also provide ability to add custom css in the Advanced tab
Start your FREE trial. No credit cards required.
Recipe Ratings Summary Divi Module & Post Meta Data
-
It represents the summary of the ratings for the given recipe
-
To add recipe rating summary to recipe template
- Open the recipe template in divi theme builder
- Insert the Recipe Ratings Summary divi module on the page.
- In the Recipe Ratings Summary Module Settings
- Use the default --Use Current Recipe Post-- for Select Recipe Post Item. It ensures we use the current recipe post when creating the recipe page.
- Show Bars : Toggle
ONto show the ratings bar for each rating option - Show If Empty: Toggle
ONto show the ratings summary is empty - Show Rating Text: Toggle
ONto show the average rating count text - Show Stars: Toggle
ONto show the rating stars - You can setup the following design settings for
- Aggregate Rating Value : Represents the aggregate rating text value
- Style font
- Text Summary: Represents the text summary of the entire rating
- Style fonts
- Percentage Bar Label : Label for the percentage bar.
- Set font style
- Completed Percentage Bar : Part of the percentage bar thats completed.
- Set background color
- Remaining Percentage Bar : Part of the percentage bar thats remaining.
- Set background color
- Percentage Bar Text Value : Text around the percentage bar.
- Style font
- Stars : Rating stars
- Set color
- Set size
- Spacing
- Border
- Box Shadow
- etc
- Aggregate Rating Value : Represents the aggregate rating text value
- We also provide ability to add custom css in the Advanced tab
Start your FREE trial. No credit cards required.
Recipe Notes Divi Module & Post Meta Data
-
Recipe notes represents additional information the author wishes to share.
-
To add a recipe notes
- Goto WordPress Admin > Food Recipes
- Edit the recipe post in non-divi mode
- Goto the Recipe Information meta box
- Add your notes in the Description post meta
-
To add recipe notes to recipe template
- Open the recipe template in divi theme builder
- Insert the Recipe Notes divi module on the page.
- In the Recipe Notes Module Settings
- Use the default --Use Current Recipe Post-- for Select Recipe Post Item. It ensures we use the current recipe post when creating the recipe page.
- You can setup the following design settings for the notes
- Recipe notes font settings
- Spacing - Margin & Padding
- Border
- Box Shadow
- etc
- We also provide ability to add custom css in the Advanced tab
Start your FREE trial. No credit cards required.
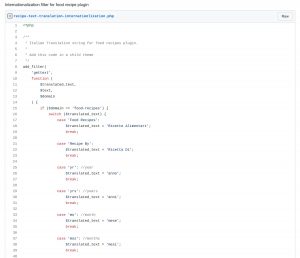
Internationalization - Translate your recipe page's fixed in your language
-
To translated fixed text like "min", "sec", "of" etc that are used on the recipe page, please follow the code snippet at https://gist.github.com/wpt00ls/e87900e241455bf829c91d1f3c12ade8.
Add it in your child theme
Start your FREE trial. No credit cards required.
Adding A Print Layout Page
-
The print layout functionality allows you to create a print version of your recipes.
-
To do this,
- Add a Divi Button module with a link to "?print=1" on your recipe layout page.
- Your website users can open a print layout page, by clicking on this button.
- On this page they can customize the recipe layout by showing or hiding elements of the recipe page such as the title, description, image, time information, nutritional, equipment, ingredients, and instructions.
- Also, users can adjust the servings count (and hence the ingredient quantities) and set the page size to A3, A4, or A5.
Start your FREE trial. No credit cards required.
Recipe Schema Data & Rich Snippet Test
-
Google provides a Rich Results Test tool.
-
We use it to test our recipe schema LD+JSON data.
-
To test recipe schema rich snippet
- Logged in your WordPress website
- Goto a recipe page that your website visitor will see. That is, your page is publicly accessible.
- Click on Check Recipe Schema at the admin bar.
- A new tab with a Rich Results Test opens using the current URL
- If the test shows error(s), you have incomplete recipe data.
Start your FREE trial. No credit cards required.